
Previous Next
6.12 Target Density
PowerFlow supports the concept of a Target Density and the ability to divide a letter into separate segments for the purposes of simplifying the shape and making it easier to achieve a specifc number of modules per square feet.
-
When the density reading for a segment is below the target, it's drawn in Blue.
-
When the density reading is within the target range, it's drawn in Green.
-
When the density reading is above the target, it's drawn in Red.
Adding Segments
To divide the letter into segments, move the cursor inside the letter and near where the segment should start or end, then press the L key. This divides the letter at the point and the density display is enabled, as shown below:
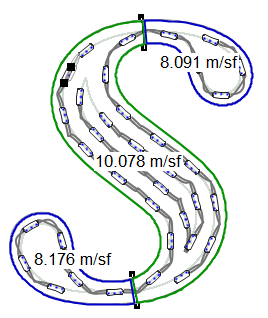
The above example has three density segments, with the middle one with the target density of 10, plus or minus .5. You can see the serifs need more modules and the density readings for them are correspondingl less than middle segment, which has a good density.
Adjusting Segments
To adjust segments after they've been created, you can drag the small handles at either end of the segment line and drag.
Removing Segments
To remove a segment, place the cursor near the segment line and press "L". "L" both adds and removes segments.
Guidelines for Creating Density Segments
In general, you want to create segments where the shape changes significantly. If you have too fewer segments, the density reading may not be accurate. If segments contains too few modules, the density reading can also be inaccurate, so strike a good balance in the number of segments.
Previous Next